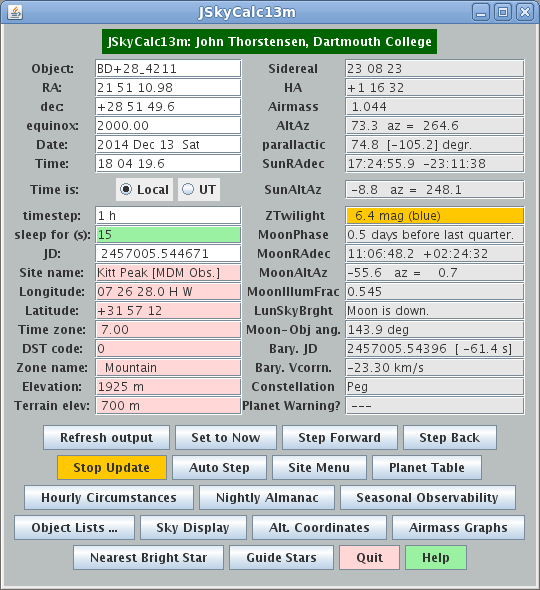
Left: The main control window for JSkyCalc13mGS. This is similar to the JSkyCalc main window, with a few extras. Right: The JSkyCalc13mGS sky display window. A list of objects has been loaded. The telescope is pointing at the red circle - it is in the zenith at the moment. The blue square shows the coordinates that have been loaded in the main window, in this case the coordinates of a standard star. The shade of blue used for the background darkens as twilight deepens, and goes to black at night. The orange arc near the pole traces the hour angle limit set by interference with the telescope's north pier.
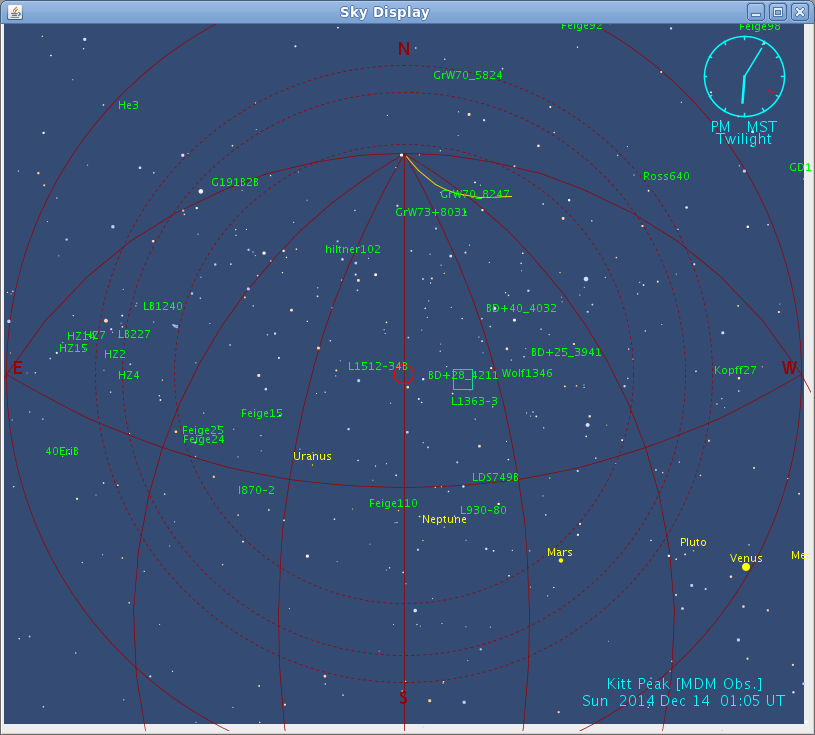
The telescope control panel GUI. You need this to control the dome and the mirror cover, turn tracking on and off, and so on.
Important Background -- What this is and What this isn't:
This is a special version of JSkyCalc, retrofitted for pointing the 1.3m telescope at MDM and selecting guide stars. It does not control the mirror cover, dome, and so on.
JSkyCalc13mGS therefore supplements the control panel GUI (shown above along with two of the JSkyCalc windows), but does not replace it. You will need to run the control panel GUI as well as JSkyCalc13m.
Both the control panel GUI and JSkyCalc13mGS work internally by talking to Dick Treffers' telescope control program over a socket, which is a little like a telephone connection between independent computer programs. Because Dick's program sits and listens for requests, it is known as a server, whereas both the TCS GUI and JSkyCalc13m are called clients. It's important to understand these points:
Here's what JSkyCalc13mGS gives you:
Using JSkyCalc13mGS at the Telescope
(Note: farther down there is a complete manual on the standard JSkyCalc.)
Starting. The program ordinarily runs on the workstation mdm13ws1 (it's available on any of the similarly-named servers. To start it, simply pull down the Applications menu and look under Telescope Control. Interally, this executes the command /usr/bin/java -cp /lhome/obspkg/thorTools/JSkyCalc13mGS JSkyCalc13mGS, which you can type from a terminal if the menu fails for some reason.
As noted earlier, JSkyCalc13mGS will refuse to start unless Dick Treffers' telescope control server is running, because Dick's program actually runs the telescope. When JSkyCalc13m starts up, it immediately tries to connect to the telescope control server; if it can't for any reason, it puts up a dialog box that lets you fix the problem:
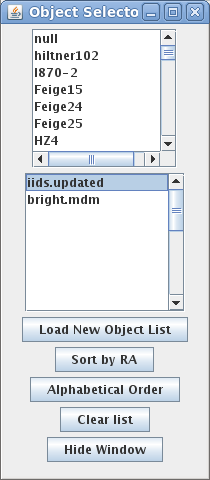
The object-selector window. The lower panels let you keep several different target lists ready to go without having to reload them every time.
Handling object lists. One main point of the program is to handle object lists, so you don't have to type in coordinates every time you set the telescope. An object list is a file with coordinates in it, with one object per line, in this format:
name_no_blanks hh mm ss dd mm ss equinoxfor example,
4U1234+56 12 34 35.3 56 01 02 1950The window labeled Object Selector handles object lists. Clicking on Load New Object List opens a file dialog; once you select a file, the names of the objects appear in the selector box at the top of the window, and the objects themselves are also marked on the Sky Display. You can now select an object in one of three ways:
Note that you can view the list in alphabetical order, as well as sorted by RA.
More than one object list. When you read in a new object list with another already loaded, it's simply merged with the old list. If you have several long lists, the display gets too crowded. For this reason, there is a provision to remember the lists you've loaded and recall them quickly, without having to navigate down through the directory heirarchy. To use this, hit the "Clear List" button and then select the file you want to load from the lower list in the object list window. If it doesn't load, do a control-click to deselect it, then select it again -- lists only load when the selection changes, so if you click it when it's already selected, nothing happens.
The list-switching feature should be helpful if you have object lists for several different categories of targets -- these might be for different programs, or appropriate to different observing conditions, or something as simple as standard stars versus program objects.

The Telescope Interface window.
Moving the telescope to a new target. The slew telescope button in the 1.3m Telescope Interface window will move the telescope so that it is pointed at the RA and dec listed at the upper left of the main JSkyCalc window. The slew won't actually start until you confirm it with the dialog box that pops up. When you confirm the slew, the program sends a request to the server for the move; if the server is busy, or if the requested coordinates are illegal, the telescope won't move. Note that the program freezes up until the telescope has finished moving. Once the move is complete, you'll see that
Note that the Telescope RA, dec, and equinox that are displayed are passive displays of the telescope position -- they do not accept user input. In JSkyCalc convention, passive fields are rendered with a a light-grey background, while fields that accept input are rendered in white. Input coordinates need to appear in the boxes in the main window, in the upper left; those boxes are automatically updated when you select a target from a list.
Note also that there's a scroll box window that reports the telescope server's responses. You can usually ignore these, but it can be helpful to scroll back through them in case something unexpected happens (it keeps a couple hundred lines). If there's some kind of problem, you may find an ERROR lurking there -- for instance, you might be trying to slew past the telescope's limits.
A bit about Auto-update and Timing ... Unlike the usual JSkyCalc, this version starts up in auto-update mode, which means it wakes up every 15 seconds or so, reads the system clock and telescope coordinates, and redisplays everything for the current moment; it behaves like a very slowly ticking clock. It's possible to speed up the action by changing the 'sleep for' value, but I don't recommend it -- that just makes it more likely that things will screw up. If you're impatient you can use the Read telescope button to get an immediate update -- but remember that this won't respond if the telescope is slewing.
If you click on the orange "Stop Update" button on the main window, it stops the automatic updating, which makes it possible to look at times and dates other that the present. This may be helpful if you're thinking about tomorrow night, or something, but if you stop auto-update, the telescope control window disappears. This is by design, because you never want to slew the telescope based on information that may not correspond to the present time. If you resume the update again (simply by clicking the button), the telescope window reappears.
Looking up Bright Stars. The Nearest Bright Star button in the main JSkyCalc13m control window looks up the bright star nearest to the telescope coordinates (not the JSkyCalc13m coordinates, which might already be set on the next object or something), and loads them into JSkyCalc13m. If you now slew to these coordinates, you should be able to find the bright star (unless there's something wrong). The bright star list is kept in equinox 2000, but the coordinates have been updated for proper motion to 2010, so they should be more than good enough for setting the telescope coordinates. (I intend to freshen the list for proper motions from time to time.)
Re-zeroing the telescope coordinates. Be careful with this, since you can easily lose track of pointing if you don't do it right. If you click the Reset tel. coords, button, the telescope coordinate readouts will be reset so that they equal the coordinates displayed in the main window. Before you fire this command, you should be certain that both these conditions are met:
The command works internally by resetting the zero points in the pointing model. It's best to do this not too far from the zenith, because the telescope flexure and so on are not very well modeled at extreme positions.
A step-by-step procedure for re-zeroing the coordinates might be:
"Situational Awareness" boxes. At the bottom of the telescope control window are boxes that simply report how long it will be until certain events happen. They show how long until twilight and sunrise (or sunset, if it's afternoon), until the telescope (if it continues tracking) will hit 2 and 3 airmasses in the west, and until the moon rises or sets. One box shows how long until the telescope hits the west limit (see below). In a few situations, the event reported is in the past; during evening twilight, for example the time since sunset is reported. During the day, the moonrise or set reported may be on the previous night, but during the day this won't matter much. This feature only makes sense when Auto update is in effect (as it is by default), so that the program's time is kept close to the actual time.
The West Limit. At declinations less than about 63 degrees, the telescope has an hour angle limit at just under 5 hr west, assuming it doesn't hit an elevation limit first. North of 63 degrees, the top ring of the telescope interferes with the north pier somewhere in the far west; for this reason a tripwire is installed that cuts the telescope power if the top ring deflects it enough.
The control software will not allow you to slew into the tripwire, but you can track into it very easily. This creates a real problem, because it normally takes two people to restart the telescope. To prevent this, JSkyCalc13mGS uses a tabulation of the measured west limit to stop the telescope tracking as the tripwire is approached. At lower declinations, the telescope doesn't hit the tripwire, but it still hits a soft limit, and the program takes this into account. At declinations south of the equator, the hour angle limit corresponds to a bit more than 4 airmasses. This far over, the telescope aperture is badly occulted by the dome wall, since the telescope swings under the pier.
The box labeled "Telescope at West Limit:" says how long you have left. If it's more than an hour, it's green; then it turns yellow, orange, and finally red when you have five minutes. If you hit the limit, the program
Warning Lights. At the bottom of the panel there three labels, "Sun:", "Moon:", and "Airmass:". Next to each is a little circle which you can think of as a warning light. The warning colors used are identical to those used for fields in the main window (and are explained in detail below), but they are computed for the telescope coordinates, not the coordinates in the main window, which may be different. If there's a situation you should be aware of -- twilight, you're too close to the moon, or the airmass is high -- these circles take on warning colors. Mostly their meanings are pretty obvious - yellow, orange or red -- but there are a few that are not:
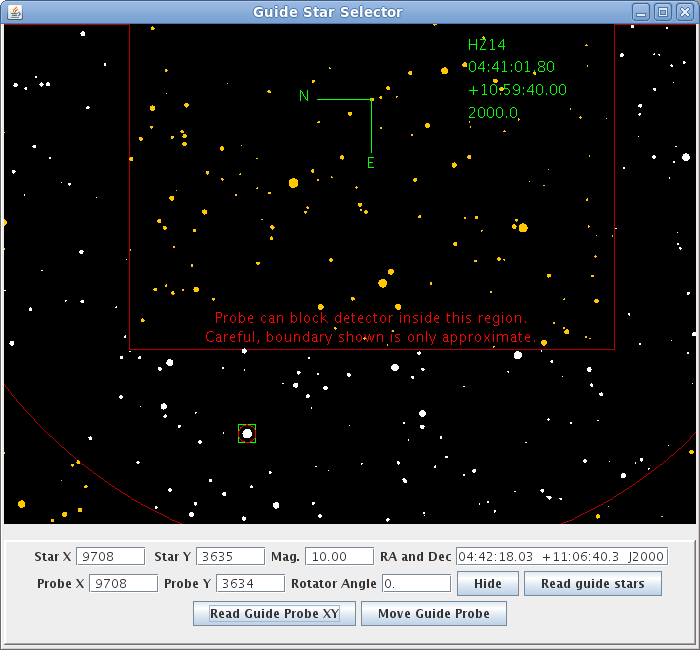
Guide Star Selector. The button labeled Guide Stars on the main window pops up the window shown above. This shows the field of regard of the XY guide probe in the Multiple Instrument System. The coordinates of the field center (upper right) are taken from the main window. You select a guide star by clicking it in the image, and pushing the move guide probe button, which pops up a confirming dialog box to keep you from mistakenly moving the guide probe during an exposure. Acquisition and guiding is described in more detail here.
Reassurance. JSkyCalc13m operates independently of the telescope -- it just listens to the telescope and sends a limited set of commands. If JSkyCalc13m crashes, or you quit out of it, the telescope will still work fine. Hopefully the program will make your work more pleasant and efficient, but it isn't essential. So relax and enjoy using it -- it's not critical to anything.
Acknowledgments. It would have been nearly impossible to develop this program without using a companion program that mimics the telescope server communications; Rick Pogge (OSU) generously shared his simulator, and offered good advice. I also want to thank Bob Barr for help testing the program at MDM.
JSkyCalc has a huge number of other capabilities, some of which may be useful (e.g. the Nightly Almanac). The manual for the standard JSkyCalc follows.
MANUAL FOR THE STANDARD VERSION
What is this for?
JSkyCalc is a tool designed to help you plan and execute astronomical observations. It shares some features with "desktop planetarium" programs such as XEphem and its many commercial alternatives, but rather than elegant visual presentation, the program emphasizes convenient controls and calculation of the quantities of greatest interest to professional astronomers.
Getting Started
The control buttons at the bottom of the frame do the following; more detailed descriptions of some of the windows they pop can be found a little further down:
The output parameters on the right-hand side of the window are:
Except for the Site Menu and Sky Display window, these other windows are all hidden on startup. You can get the windows to show using the buttons at the bottom of the main panel -- the buttons toggle the corresponding window on and off. Most of the windows also have their own "hide" buttons. Don't use your windowing system's buttons to close windows, as this can kill processes.
The Hourly Circumstances window is a popular favorite. It gives the circumstances for the object coordinates (from the main window), computed for each hour through the night. Time is given in Local, UT, and sidereal (LST), followed by the hour angle and airmass, followed by the altitude of the moon and the sun. Warning colors (red, orange, yellow, light purple, and blue) are used in the HA, airmass, moonalt, and sunalt columns. If the time in the main window is before noon, the previous night is shown; if the time is after noon, the coming night is shown. This is so that if you run a calculation with the time set to 2 AM, it computes the table for the most appropriate night.
The refresh time for this window can be noticeable; if you're not using the output, you can hide it using the button provided, which turns off the refresh and can speed things up a bit. You can put the window back up using the button in the main window.
A button is provided to dump the contents of this window to a file in your local directory. The output is appended to the file, so you can run a number of objects and then print the file.
The Nightly Almanac window gives times of sunset, sunrise, twilight (when the sun is 18 degrees below the horizon), moonrise, and moonset, defined as when the upper limb is on the visible horizon. When the terrain elevation is zero (this quantity is defined here as the elevation of the observatory above the terrain that forms its horizon), the rise and set times are computed for when the center of the sun or moon is 90 degrees, 50 minutes from the zenith, which accounts roughly for atmospheric refraction and the angular size. If the terrain elevation is greater than zero, the rise and set times are adjusted accordingly. The sidereal times at evening and morning 18-degree twilight are also listed.
If the time in the main program is before local noon, the previous night is computed. If it's after local noon, the next night is computed. This is just like the Hourly Circumstances window. The window is invisible on startup, but can be revealed or hidden using the buttons provided.
The Planet Table gives low-precision coordinates of the planets, derived from algorithms given by Jean Meeus in Astronomical Formulae for Calculators (Willman-Bell). The inner planets are good to about a minute of arc, but the outer planets are somewhat worse, and Pluto (I know, it's not a planet any more officially) is pretty bad. Coordinates are in the epoch of date. (These planetary positions are also used internally to find the offset between the heliocenter and the barycenter for the barycentric corrections.) The last column in the table, Proximity, gives the angular distance between the planet and the coordinates that are used in the main window. The planet table can be printed using the built-in print method provided by Java for this class.
The Object List window lets you read in a list of astronomical objects. Reading in a list of objects read in greatly enhances the usability and power of the program -- you don't have to type in coordinates, and the objects are graphed on the Sky Display. The list must be in this format:
name_no_blanks hh mm ss dd mm ss equinoxfor example,
4U1234+56 12 34 35.3 56 01 02 1950The format is dictated by the telescope pointing list format expected at MDM Observatory, where I do most of my observing. Colons are acceptable as delimiters for the RA and dec fields (but be advised that they don't work with the MDM telescope software). The Load Object List button pops a file-selecting dialog box. Once you've loaded up a list, you can click on the object you want, and it will be loaded into the program. If you prefer, you can also select an object by typing its exact name into the Object: field in the main window and pressing the Enter key. You can present the list in either RA or alphabetical order using the buttons provided, and the Clear List button deletes all the objects (but for technical reasons, a single object called null at zero hours and zero degrees will remain). A hide button is provided also.
The Alternate Coordinates window gives the coordinates precessed to the equinox of date, the galactic coordinates, (which are rigorously accurate), and ecliptic coordinates. There's no hide button -- use the button on the main window to toggle the window on and off.
The white background behind the galactic coordinates signifies that they can be used for input. Entering a value in the galactic latitude or longitude fields and pressing Enter sets the coordinates in the main window to the location specified by the longitude and latitude you entered. Thus the program can serve as a galactic-to-equatorial converter. I have not implemented an analagous function for ecliptic coordinates.
The Seasonal Observability window is useful for planning when to observe an object (for example, in filling out a time request form). It takes the date from the main window, figures out when new and full moons will occur for about three months on either side, and generates a table, each line of which gives a brief summary of the object's observability at each of these dates. The hour angle and airmass are given at the start of the night, the natural center of the night, and the end of the night. The last three columns give the number of hours that the object is accessible without twilight and at airmasses of less than 3, less than 2, and less than 1.5. A button is provided to print the output.
The Sky Display button in the main window toggles the display on and off (it does take a lot of screen real estate). The window plots a map of the sky, showing stars to V = 4.5, the sun, moon, and the planets (including Pluto, whatever you want to call it). If you have an object list loaded, it also plots each object as a text string, the bottom of which is centered on the object. The coordinates in the main program are marked with a greenish box. The stars are generally not plotted in a pure white, but with a color derived from the spectral type; the RGB values chosen to represent the spectral types are based on those computed by M. N. Charity (see http://www.vendian.org/mncharity/dir3/starcolor/). I de-saturated his suggested colors slightly (moved them toward white) because the full colors were a bit distracting.
Red arcs indicate the meridian, the equator, and lines of constant hour angle every 2 h out to +- 6 h. Dotted red circles indicate 2, 3, and 4 airmasses.
The moon is drawn at exaggerated size but in the correct phase and orientation. The planets are sized according to magnitude, with the fainter ones rendered as very small dots. A clock drawn in the upper right corner shows the prevailing local time; the Site and Universal Time information are printed at the lower right. The background color is controlled by where the sun is -- when there is no twilight the background is black (even if the moon is bright). There's a small, discontinous jump to dark grey at the beginning and end of twilight, and a continuous ramp between twilight and daylight, which is rendered in blue. This proves very helpful in keeping the user oriented in time.
The sky display updates whenever the main window changes, so the Auto Step command results in a somewhat jerky animation.
The sky display recognizes several mouse and keyboard commands , as follows. But first, note that the window will not respond to the keyboard commands unless it has focus (with most systems, this is indicated by some kind of change in the window border). The mouse commands work regardless (though I have heard of people having issues with these features on Macs running OS-X).
This is surely an incomplete list:
This program is a re-implementation in Java of the venerable skycalc code, which is a text-only program written entirely in C. A couple of years ago I wrote a graphical user interface for skycalc by wrapping the C routines in Python and implementing the user interface with Python's Tkinter module. One version of this also has a sky display, which uses the Python wrapper around PGPLOT. This has proven extremely useful, but the software dependencies make installation complicated (and probably impossible on Windows), so I undertook the present effort for the sake of portability.
Accuracy. A rough extrapolation of delta-T is used for the time argument of the lunar and solar calculations. The sun should be good to 1 arcsecond or so, the moon to a few arcseconds. Comparison with the JPL ephemerides shows that the barycentric corrections are good to a few meters per second in velocity and a few hundredths of a second in time. The precession routine used conforms to the IAU 1976 resolutions, and is not as rigorous as the 2000 conventions; the penalty in accuracy is of order 0.1 arcsecond. As noted above, the planetary ephemerides are only accurate enough for rough purposes. The text-based Skycalc program has an extensive manual describing the algorithms used; the present Java code uses the same algorithms (and gives identical results as far as I have been able to test).
Legalities. I am offering this program freely but claim copyright. Anyone may copy and modify the code, provided that the credit banner with my name and institutional affiliation is not altered. Although I have been careful to ensure that the code is correct, I make no claim that it will always be correct or sufficiently accurate. I also make no claim that it will be suitable for your application. This code should never be relied for applications in which personal safety might be an issue, and it should not be considered authoritative for legal purposes.
I will not be able to answer all queries, but if you believe there is a bug, or have a suggestion for an improvement, or just want to comment, please do email me (john dot thorstensen at dartmouth dot edu).