Scripts for Centering and Focusing OWL-based Direct Images
John Thorstensen, Dartmouth College
Last revision 2014 June
The point:
It is sometimes desirable to center a direct image accurately.
The MDM telescopes point reasonably well, but not to
arcsecond precision, so accurate centering requires lots
of overhead -- taking
a test shot, displaying it, consulting your finding chart, figuring
out how far to move the telescope (and it always seems like you
have less than a 50-50 chance of getting the sign right),
and so on. This tedious process wastes telescope time.
Also, you want your images to be IN FOCUS, unless you're
deliberately de-focusing them for some reason. The focus
of the 2.4m changes with temperature -- the numbers tend to
decrease as the night goes on -- so it's very useful to have
a reasonably efficient way of focusing. Also, one should
be aware that, while sets of filters are generally
constructed to be parfocal (equal optical thickness),
mixing and matching filters from different sets leads to
focus shifts between the filters, which you'll have to measure.
What this is:
This document describes two scripts to help with these issues:
- centermdmtask.py, a script you can run to
find stars in your image, fit them to a star catalog, and
tell you how to center your target; and
- focustest.py, a script you can use to quickly
measure a focus test frame and give a precise value
for the optimal focus.
These scripts are tuned to work on facility CCD images
written by Owl. It may be possible to adapt them to
direct images taken by the 4k imagers or TIFKAM. Much of
the functionality of centermdmtask is already
included in osctrtask; the focustest
task would take some adapting, because it looks for the
"focus" keyword in the header and assumes it's the last
value in the sequence. In addition, as of this writing
there is no way to take a multiple-exposure focus frame at the
1.3m. This may be possible, but it is unimplemented.
Getting Started.
- Get a terminal window by clicking on the little terminal
icon in the top bar.
- Make yourself a scratch directory and get into it.
		mkdir myscratch
		cd myscratch
- Get copies of the relevant scripts (so you can modify them
as you like):
		cp /usr/local/pkg/thorsoft/scripts/centermdmtask.py .
		cp /usr/local/pkg/thorsoft/scripts/findfoc.py .
(Note that both those commands have an isolated dot at the end.)
- By default, findfoc.py will grab focus scratch images from
mdmarc1. If you're using a different machine, fire up your favorite
text editor and change the line in
findfoc.py that specifies "datadir", so it points
at the top data directory of the data-taking system, e.g.
/data/mdmarc2 .
- If you have a target file (highly recommended!), copy
it into the directory. The list must be a standard MDM pointing
file, that is, each line looks something like
name_no_blanks 15 23 25.2 -0 12 13 2000.
You shouldn't need to modify centermdmtask.py, but it
will be useful to have it here anyway.
Using centermdmtask
Because there are a lot of knobs you can adjust, the script runs
as a pyraf task, so you can use the pyraf parameter editor.
taken an image of your field, and
you want to establish celestial coordinates in the image and
get accurate directions as to how to center your target.
Setting the script up. Do this before you start observing.
Running the script. Once again, epar centermdm (you can abbreviate the task name),
and provide
- The image number imnum and
- The target information, either as a name from the list or as a specified RA and dec.
and then press the Execute button, and away you go.
What it does: The script runs sextractor on the image to find
objects, and then passes the list through a filter that should find stellar
images. It also reads the image header, and from this finds the RA and dec
written by the telescope. Then it goes to the PPMXL stars catalog (compiled
from a number of high-accuracy astrometric catalogs).
gets a list of stars in the vicinity of the telescope
coordinates, and tries to establish the match between stars detected on the
image and stars from the PPMXL. (Note: the algorithm uses the KNOWN image scale to
evaluate putative matches, so you must have secpix set to better than
1 percent!) . If it finds more than three matches, it tries
to do a coordinate solution, and presents it to you. if it thinks it's
succeeded, you'll get a prompt like
Accept this fit?
-- above it will be the field rotation (which should be close to a multiple
of 90 degrees in most cases), the RMS of the fit (generally below 1 arcsec for
a successful fit), and so on, so you can see if it's sane.
If you get a good fit, answer 'y', and the program will go on to tell you
how far off the telescope is pointing, where the target is on the chip,
and what coordinates to set the telescope to in order to place your
object in the desired location on the chip. Just move the telescope with the
hand paddle (turn off the guiding if you started it) and you'll be very
close to centered. Or, you may decide that you're already pretty close --
if you've used the dial-a-guide-star technique, described
in the
guiding and acquisition manual and shown live in the video manual --
you should be very close to centered.
Error conditions There are various ways for this to screw up --
fortunately, it's purely advisory and doesn't actually move anything.
It generally tells you about various problems in a fairly self-explanatory
way -- just read the output. Some common issues:
- The program
doesn't find a match, or finds a false match (usually obvious
because of a wildly-wrong rotation). In that case you'll just have
to look at your
finding chart and figure out what's going on. The program often has
trouble in very sparse (small) fields, in very crowded fields like
the Galactic center, and on very poor images (e.g., trailed).
- If your telescope pointing is sufficiently far off, the
program will grab a piece of the PPMXL that doesn't overlap your field
adequately.
Your telescope coordinates need to be fairly accurate (a few arcmin)
for the program to work.
- If you specify target coordinates that are very far from the
telescope coordinates, the program will complain.
- The program produces a fair amount of vestigial gibberish from
the star-finding stuff, which can be ignored.
Other ... The program produces various junk files
(imagename.cat, imagename.radec.match.wcs, and so on) that you
can chuck. Run in a subdirectory to avoid cluttering up your
main workspace. The program is adapted from starfinding code
I wrote years ago, which you might find useful but which is
a bit tempremental. If you want it, I can set you up with it.
Getting the best focus with findfoc.py
This script is designed for fine-tuning the focus. If you're
way out of focus, take test shots first to walk in on the rough
focus before using this.
The Owl control
system for the facility CCDs has a focus-frame script that runs
on the 2.4m only at this point; it creates a multiple exposure
by repeatedly opening the shutter for 10 seconds, closing it, then increasing the
focus by 10 units and offsetting the telescope by 10 arcseconds north.
The last image is offset by 20 arcsec, so you can tell at a glance
which image is the final one. The last focus value is written
into the header. The image is always written to /home/data/scratchimage.fit
on the mdmarc computer, i.e. in /data/mdmarc1/scratchimage.fit when
viewed from mdm24ws1. If you've selected your first focus
value correctly, the star images should go in and out of focus,
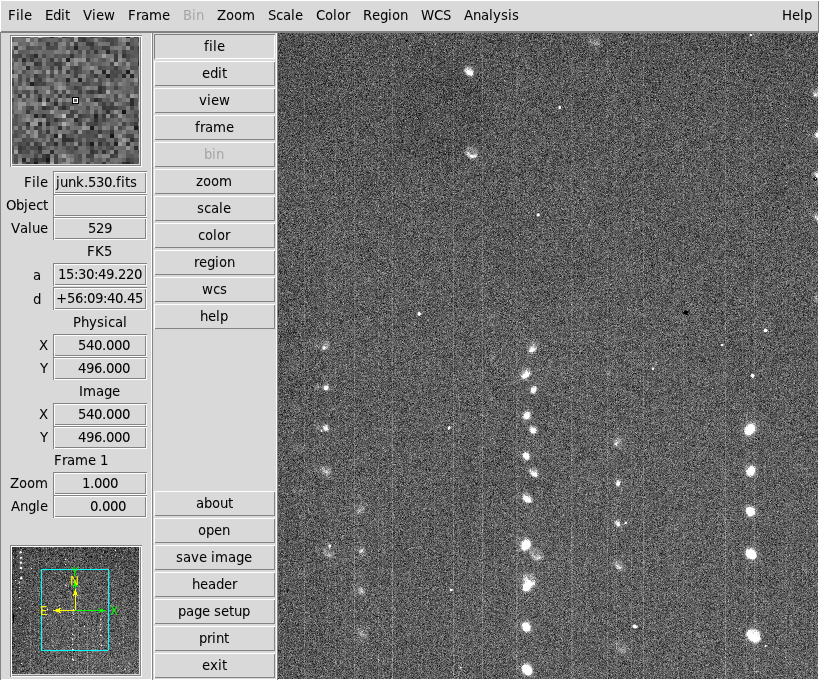
and you can interpolate the best focus value. Here's an example
(it's ds9, but I've put the toolbar on the side to save vertical space
on the laptop.):
The focustest script takes the guesswork out of the interpolation.
To use it, simply set up the path to scratchimage as noted
earlier, be sure a ds9 window is open, and then
./findfoc.py
It assumes the file it's going for is "scratchimage.fit"; if it's not
you can specify another image on the command line.
Here's what it does:
- Displays the image on ds9.
- The program instructs you what to do next:
- Select a good focus star -- bright enough, unsaturated, uncrowded etc.
- Use 'r' to mark the images of the star in order from first to last
i.e. the last image you mark should be the one at the end of the big gap.
- The 'r' will plot an image profile for each image.
- When you've finished, type 'q' in ds9.
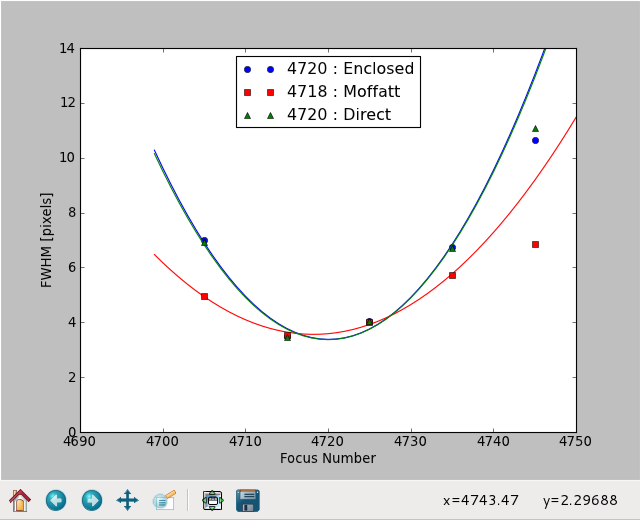
- The program now 'harvests' the results of the profile fits you've done with 'r'.
- It combines these with the last focus value and the known 10-unit focus step to
make arrays of FWHM vs. focus for the three different algorithms that 'r' uses.
- Finally, it fits these with parabolas, finds the parabolic minima, and makes
a nice little graph of the results (below).
- The graph legend gives the locations of the minima. In this example case,
I'd set to 4719.
- Note that if the Owl focus script has timed out, the values given may
be off by 10 units; check to be sure that the highest focus value on the graph
matches the last focus value reported on the TCS monitor.
- You can quit the program by typing 'q' in the graph, or with its close button.
Remarks. If the seeing is fluctuating quickly, you will of course
get bad results, but cest la vie. Also, the Moffatt fit seems to be
rather delicate.
