Using Owl to Control the Facility CCDs
John Thorstensen, Dartmouth College
2014 June 21
Background
The facility CCDs at MDM -- Echelle, Templeton,
Wilbur, and Nellie --
are the only detectors that work with
the Modspec and MarkIII spectrographs, and are often
the detectors of choice for other projects as well.
These detectors were brought on line in
the 1990s, largely by John Tonry and Mark Metzger,
using Gen I Leach controllers (made by Bob Leach's
company, Astronomical Research Cameras, or ARC),
and Sun Sparcstations.
The Leach controllers have held up well through
the years, but the computers and some of the
other electronics became increasingly difficult
to maintain. In the spring of 2011 we decided
to replace the controllers and computers with
new Leach Gen III controllers and PCs running
Linux. This was our second run at
project -- about five years ago I had
tried to fix the situation by simply replacing
the computers and the interface cards, without
replacing the controllers. This
proved to be Byzantinely complex, far more than
I could manage,
but at that time we bought some nice
little computers made by Shuttle. These
are almost unused and in good shape, so
we have pressed them into service again.
In the summer of 2011, Bob Barr hand-delivered
the first system (Nellie)
to ARC in San Diego. They replaced the
interface cards, installed their latest
software on the computer, and tuned up the
system. it was delivered
to MDM on 2011 September 14, and first mounted
on the telescope on September 16. As of this
writing, Templeton and Wilbur are at ARC,
and Echelle is to be shipped soon.
All three of our controller-card boxes are
being modified to take the new controller
cards, so there is no turning back.
In the old system, the venerable command-line
oriented program CCDCOM served as a front
end for the detectors. This had its idiosyncracies
but was reasonably observer-friendly.
We have not ported CCDCOM for use with the new
Leach controllers, and at this time have no
firm plans to do so. The only
interace available immediately is Owl,
which is ARC's GUI-based program developed
largely for
engineering work. It has no native provision
for reading telescope information and the like,
and it isn't optimized for taking
astronomical data. Fortunately, it does
have provisions for customization using
scripts. I have developed software
to adapt Owl to the MDM environment, so we
have a system that is usable for data taking.
The interface is radically different from
CCDCOM.
Getting Started
Owl can run on three machines called mdmarc1 through
mdmarc3. These are all running CentOS Linux.
You run owl from your
console machine (hiltner or mcgraw); here's the procedure.
Open a terminal window on the machine you're sitting at.
In this terminal window, type ssh -l arc mdmarc1
(or whatever the machine you're using is). You will need the
arc password, which you should get from the staff.
Type owl & to start owl. In a few moments a
big owl in the shape of a "3" will appear, and the owl
control window should pop up.
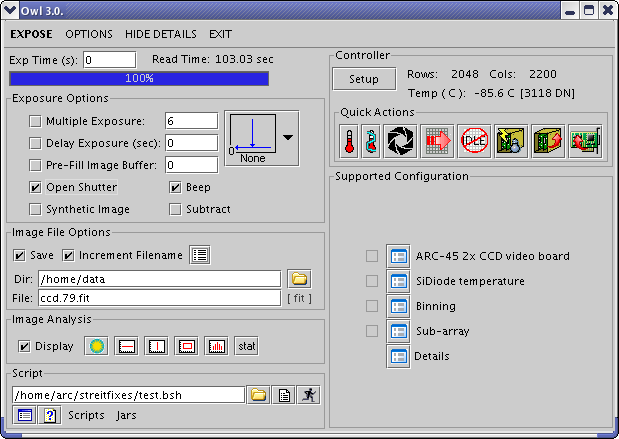 Notice also the plain-white Owl Log window, which
is where informational and ERROR
messages are printed, the latter in a nice garish red.
In the upper right, under Controller, click on the Setup button.
This brings up a window that looks like this:
Notice also the plain-white Owl Log window, which
is where informational and ERROR
messages are printed, the latter in a nice garish red.
In the upper right, under Controller, click on the Setup button.
This brings up a window that looks like this:
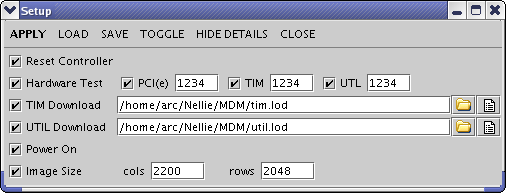 Note carefully the .lod files specified in the
TIM Download and UTIL Download fields.
They must be correct for the detctor
you are using! The staff will generally see to it that
they are, but it's good to check.
Also check the Image Size; cols should be larger
than the actual area, so you get an overscan region, while
rows should be the correct number of rows.
Be sure all the boxes on the left are checked; then
once you're happy click on APPLY on the upper
left. In the Owl Log window, you'll see a bunch of messages
go by; if there are no errors, you should be all set.
Note carefully the .lod files specified in the
TIM Download and UTIL Download fields.
They must be correct for the detctor
you are using! The staff will generally see to it that
they are, but it's good to check.
Also check the Image Size; cols should be larger
than the actual area, so you get an overscan region, while
rows should be the correct number of rows.
Be sure all the boxes on the left are checked; then
once you're happy click on APPLY on the upper
left. In the Owl Log window, you'll see a bunch of messages
go by; if there are no errors, you should be all set.
Setting Up the FITS Header
In the main control window, in the Image File Options
box toward the lower left, there is a little icon that looks
like a tiny page of text; it's next to the words
"Increment Filename". Click on this, and the Fits Header
window opens. A long list of MDM header
keywords should appear, similar to this:.
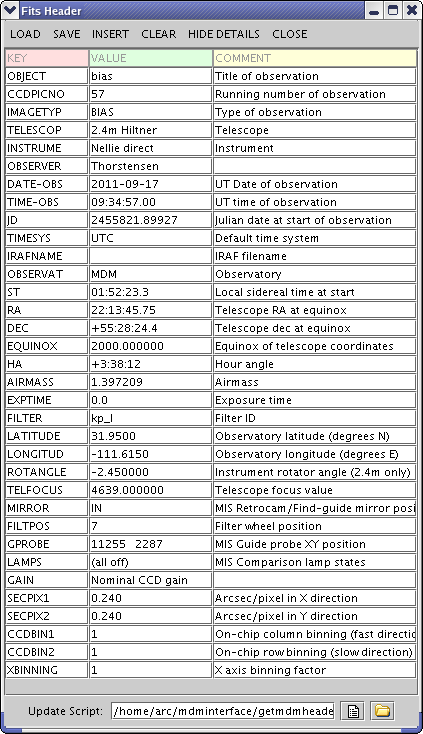
If the keywords don't appear, you have to load them.
Just hit the LOAD button at the upper
left, and use the dialog box to find
mdminterface/mdmheader.xml
When you open this, the template of keywords
will be set up for you.
Once you have them set up, go down the list and
fill in your instrument and your name for the
observer. Fill in the GAIN and SECPIX keywords
if you know them; for Nellie, SECPIX at the
2.4m is 0.240, for Echelle or Templeton it's
0.275. Templeton at the 1.3m is something
like 0.502. [My star-finding algorithms depend
on this keyword, but you may not care.]
Now, the most important step: specify the
update script at the bottom of the window.
For the 2.4m this should be
/home/arc/mdminterface/getmdmheader.bsh [note: 2.4m only.]
You don't have to type it, simply use the
little yellow folder gui to find it and load it.
[ I hope to write the corresponding script for the
1.3m tomorrow (!); if I can manage it, I'll
give it some obvious, similar name. ]
This getmdmheader.bsh is an elaborate
script written in the bean shell, which
is a java-based scripting language understood
by owl. It has code to go and read the
telescope and MIS information, and to fill
in the appropriate FITS keywords automatically.
The FITS header script runs when you hit EXPOSE to
start an exposure, so all the values are
read at that time. The time written is
from the system clock, which is on NTP; the
prep time for the chip, and so on, is only
a second or two, which should be accurate enough
for most purposes.
The script can't do everything, though -- you
need to fill in the following by hand
for each new object:
The OBJECT (title, e.g. "vega" or "flat lamp")
The IMAGETYP (e.g. "OBJECT", "FLATFIELD", "BIAS", "COMPARISON", and so on).
While this is usually "OBJECT", if you remember to fill it in,
reduction pipelines can use it to find calibration exposures.
You can change any value by simply editing the
field in the Fits header window.
CCDPICNO is useful. It is a running number
that increments automatically each time the
update script is executed. More on this later.
Taking Data
Where will my data go? In the main
window, look for Image file options.
Check Save and Increment filename
unless you're just fooling around. For the
Dir I recommend specifying
/home/data or a subdirectory below
that (which you should create first), because
/home/data is cross-mounted
on the other machines, so that on hiltner
(for example) it's available as /data/mdmarc1.
The mdmarc machines don't have much analysis
software (e.g. no IRAF). The cross-mounted
directory makes it easy to examine your
data more closely, and trivial to copy elsewhere.
A similar directory structure was used on the old
Sparcstations.
For File:, you'll want something like
ccd.1.fit. After you write out an
exposure, the software looks for a number before
the last "dot" in the filename, and increments
it. [Unfortunately, it doesn't insert any
leading zeros, so the lexicographic order
of the files won't match their actual order.]
Now, it's also useful to have a running number
in the header -- that's what CCDPICNO is for.
But CCDPICNO updates at the start of the
exposure. Therefore, if you set it to one less than
the number in the file name before you
take the exposure, then CCDPICNO will match
the number in the filename in the final
product. The sequence of events in updating
these numbers means that
- Before an exposure, CCDPICNO should be
one less than the number that shows in the
file name box;
- During an exposure, CCDPICNO should be
equal to the file number.
- If you ABORT an exposure, CCDPICNO will
be too large by one, unless you set it back.
(That's because it's already been updated, while
the filename has not.)
There's nothing to stop you from manually editing
things during an exposure or readout, by the
way -- the contents of the Fits Header window
only get written to the file at the end of the
sequence (though their values are filled in
at the start).
You'll want to copy over your data onto
hiltner or something pretty frequently as
a backup.
Setting up for exposures. This
is straightforward.
- If a ds9 image-viewing window isn't up already,
open one by clicking on the little yellow-and-green
sun-like symbol in the
Image analysis section of the main
window.
- Fill in the exposure time.
- Scan the Exposure Options. `Multiple
Exposures' means `how many repeats'.
Be sure `Open Shutter' is selected, unless
you're doing darks or biases. It's easy
to take darks or biases and forget to
check the open shutter box before proceeding.
This has drastic consequences for the effective
quantum efficiency.
- Over in the FITS header window, check:
- OBJECT
- IMAGETYP
- CCDPICNO [should be file number minus 1].
- When you're ready, click on EXPOSE.
It turns into a red ABORT
button, which does just what it says, and a blue
PAUSE button appears
next to it. A countdown appears in the
progress bar.
- When the exposure is over, a progress
bar follows the readout. The progress bar is
rendered in a
random color,
because the developer
got bored with the same old color all the time.
Direct-Image Focusing at the 2.4m
Obtaining good focus with a slow-reading
chip is time-consuming. One good way to do it
is a focus frame. To do this,
you put several exposures on a single image,
offsetting the telescope and changing the
focus value between exposures.
Each star makes a line of dots
that ideally go from bad focus, through good
focus, to bad focus on the other side.
Knowing the focus numbers for each spot,
you interpolate the best focus and set it.
Owl has no provision for taking this kind of
an image -- an exposure
either has the shutter open or not, and the
image is read out every time.
I therefore wrote a script called focustest.bsh,
which gets around this limitation but only at the
2.4m as of this writing. It uses primitive
commands to generate a focus frame, unfortunately
with no flexibility for the user. It's only
useful when you have a pretty good idea where
the focus is (say within 15 units).
Point at your field (almost all fields have
enough random stars for this to work).
If you've started tracking a guide star
with Maxim DL, disable it -- this needs
to be unguided.
If JSkyCalc is running, hit Stop update
on the main JSkyCalc window. Interference from JSkyCalc
chatter can cause the script to lose track.
On the TCS, be sure the telescope coordinates
match the Next Object coordinates
to within a couple of arcsec. If you've
just set on your object and haven't done anything
else, this should be true; otherwise just hit
Go on xtcs to make it so.
If you're using non-parfocal filters, be sure
the filter you want is in the beam.
Use the telescope paddle to set the telescope focus to
a value about 25 units smaller than
your estimated focus.
In the main owl window, find the word
Scripts at the lower left, and click on
it; a pop-up menu appears. If focustest
is on it, just select it and it starts. If
not, use the Add scripts dialog to
add it to the menu; it's to be found in
mdminterface/focustest.bsh.
The script will now execute -- watch
the Owl Log window as it progresses.
The exposure occurs without doing anything
with the Owl GUI -- it's all happening
"behind the scenes", so to speak.
Keep a careful eye on the Owl Log monitor
to be sure that it doesn't time out, and that
it reports the focus values correctly. --
it can get confused occasionally.
If you watch the telescope monitor, you'll
see that between exposures, the telescope is moving
north a bit and the focus is incrementing
by 10 units. The Owl Log reports on this.
The last exposure is offset by 20 arcsec,
and the focus is not incremented following
the last exposure. A little while after
the sequence is done,
the image reads out; every
few seconds it tells you how many pixels
it has read.
The image is written into
/home/data/scratchimage.fit -- there's no
choice. You can examine it with IRAF on
hiltner or wherever. The image has some header
information so you can verify that you're
looking at the right image, and the last
focus value is also recorded.
Each star will appear as four
dots, then a bigger gap, then a fifth dot.
The big gap indicates the final exposure.
If you use imexam in IRAf, you can interpolate
the best focus to within a couple of
units.
Note that the script leaves
the 'Next Object' coordinates in the TCS
50 arcsec north
of where they were.. The quickest way
to get back is to repeat Send Coords
and Go on the TCS gui; the first restores
the original object coordinates if you haven't
changed them, and the second resets the telescope.
Manually set the focus value you've derived.
[I should just make it drive the telescope back.]
Changing the Readout Format
These are done with the Sub-array and
Binning dialogs. You invoke these
by clicking on their icons in the lower right
part of the owl window ("Supported Configurations").
For both of them, you make the changes you want,
and then click on RUN to load the
configurations into the controller.
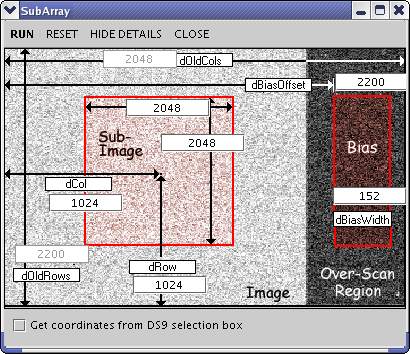 The subarray window lets you specify the
parameters with a GUI (above). The
example shown is reading the full
2048 x 2048 array; notice that the dCol and
dRow parameters are for the center
of the subregion. The dBiasOffset parameter
should be all the columns, including the
bias, for some reason that I don't fully
understand. Notice that OldRows and
OldColumns seem to be reversed in this
figure; they're not editable, and
there may be a bug that inverts them if you hit
RESET. So it's probably best, if you revert
to the full array, to put in the parameters
explicitly. If you do hit RESET, look carefully
at the Controller section of the
gui to be sure that the rows and columns are
correct, and not transposed! If they're
transposed, run the Setup again with the
columns and rows right, and you should be
good.
The subarray window lets you specify the
parameters with a GUI (above). The
example shown is reading the full
2048 x 2048 array; notice that the dCol and
dRow parameters are for the center
of the subregion. The dBiasOffset parameter
should be all the columns, including the
bias, for some reason that I don't fully
understand. Notice that OldRows and
OldColumns seem to be reversed in this
figure; they're not editable, and
there may be a bug that inverts them if you hit
RESET. So it's probably best, if you revert
to the full array, to put in the parameters
explicitly. If you do hit RESET, look carefully
at the Controller section of the
gui to be sure that the rows and columns are
correct, and not transposed! If they're
transposed, run the Setup again with the
columns and rows right, and you should be
good.
The binning tool is much simpler -- just
select the binning you want, and hit RUN.
I have little experience with
this; be especially careful, because it may
interact oddly with subarrays.
Quick Actions
The Quick Actions section on the gui has
some useful buttons, and some dangerous
ones!
The little thermometer refreshes the temperature
measurement; with Nellie, at the moment, the
calibration seems to be off a bit so that the
chip registers warmer than it is; it reads
-86, but it's somewhat cooler. The shutter
button opens and closes the shutter, but
it's not intuitive; when it shows open, it's
actually closed, and vice versa.
The next button, with the red right-sweeping
arrow over a grid, clears the chip. This
is often a good thing to do.
The last three buttons are to be avoided -
they toggle power to the controller, reset the
controller, and do other low-level hardware
stuff that you probably don't want to mess
with, especially if you're observing!
Do-it-yourself Scripts
First -- if you do write your own scripts for owl
by modifying mine, please do not modify
the originals.
If you have some experience with Java, you'll
find the bean shell that's used for scripting to
be fairly straightforward. The header script
makes heavy use of my own classes from
JSkyCalc; these are in the mdminterface
directory. Controlling the CCD is somewhat
more challenging, but the focus script
may help you see how to do it.
There is also documentation on the mdmarc machines
in /usr/local/Owl/3.0 -- there's a doc directory,
and also a Scripts directory that has
examples of the code.
Further Documentation
The Owl user's manual -- the general-purpose
edition by the developer, Scott Streit -- is in the
/usr/local/Owl/3.0/doc directory on the mdmarc
machines. If I've done my job right you
won't need to refer to it.